-40%
Cup Turner For Epoxy Resin Crafts Tumblers Cup Spinner Cuptisserie DIY Kits T4G7
$ 20.29
- Description
- Size Guide
Description
Made of fine quality material, practical, easy to operate and use, wide application , has a long service life.Features:
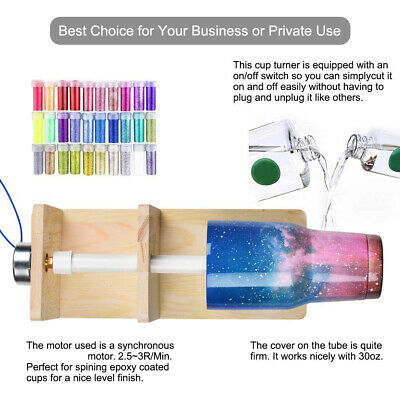
Easy to assemble: follow the simple assembly instructions and plug in and play. The switch will allow you to start, stop or change the direction of rotation.
Easy to use: when connected to the power supply, it will rotate slowly to ensure that the epoxy resin is evenly dried.
Perfect quality: the wood is thick and sturdy, and the base is heavy enough that the cup turner does not move when rotating; it also comes with a reliable motor so peace of mind with no over heating.
Versatile: the cup turner can help you design your own special cups and also allow you to enjoy the DIY process at home. Suitable for DIY printing of various cups under 30 ounces.
Specifications:
Main material: sponge+wood
Type: 1-8 (optional)
Power: 4W
Rated speed: 2.5~3r/min
Suitable for DIY printing of various cups under 30 ounces
Package size:
Type 1 and 2: 345 * 160 * 50mm / 13.6 * 6.3 * 2.0in
Type 3/4/5/6: 345 * 160 * 70mm / 13.6 * 6.3 * 2.8in
Type 7 and 8: 340 * 140 * 95mm / 13.6 * 5.5 * 3.7in
Package weight: 800g / 1.8lb
How to assemble the cup turner:
1. Use the allen wrench to tighten the motor shaft to the electric motor.
2. Secure the motor and oak clapboard with 2 screws.
3. the hole of the pipe cap with the motor shaft and place the cap on that, then tighten the screw.
4. Fix the two wood clapboards on to the baseplate with the screws.
5. Place the PVC tube (wand) on to the pipe cap and tighten.
6. Connect the power cord to the motor.
Package list: (optional)
Type 1/2:
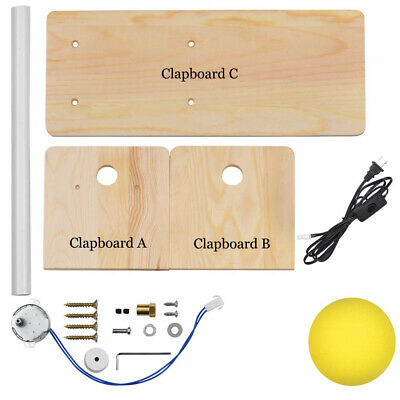
1 * Baseplate
2 * Wood Clapboard
1 * Yellow Sponge Ball
1 * PVC Tube (Wand)
1 * Pipe Cap
1 * Power Cord
1 * Electric Motor and Motor Shaft
1 * Set of Mounting Accessories
or
Type 3/4:
1 * Baseplate
2 * Wood Clapboard
1 * Yellow Sponge Ball
1 * Black Sponge Roll
1 * PVC Tube (Wand)
1 * Pipe Cap
1 * Power Cord
1 * Electric Motor and Motor Shaft
1 * Set of Mounting Accessories
or
Type 5/6:
1 * Baseplate
2 * Wood Clapboard
1 * Colorful Ball
1 * PVC Tube (Wand)
1 * Pipe Cap
1 * Power Cord
1 * Electric Motor and Motor Shaft
1 * Set of Mounting Accessories
or
Type 7/8:
1 * Baseplate
2 * Wood Clapboard
1 * Black Sponge Cylinder
1 * PVC Tube (Wand)
1 * Pipe Cap
1 * Power Cord
1 * Electric Motor and Motor Shaft
1 * Set of Mounting Accessories
E8831US-1
